
The 10 Most Dangerous DIY Nail Mistakes You’re Making (And How to Fix Them Before It’s Too Late)

DIY nail care has become wildly popular, but it’s not without risks. Improper techniques like overfiling or aggressive trimming can irritate your skin. Neglecting hydration weakens nails, while unclean tools increase infection risks. Allergic reactions from uncured gels are another hidden danger. Safe practices protect you from these dangerous DIY nail mistakes.
Key Takeaways
-
Don’t file your nails too much. Use soft methods and proper tools to keep nails strong and safe.
-
Look at the expiration dates on nail items. Fresh products help avoid infections and work better.
-
Shield your skin from UV light with nail lamps. Use sunscreen or try safer options like LED lamps.
Mistake #1: Over-Filing Your Nails
Why Over-Filing is Harmful
Over-filing might seem like a harmless part of your DIY manicure routine, but it’s one of the most common nail mistakes that can lead to serious damage. When you file too aggressively, you risk thinning your nails, making them weak and prone to breakage. Over filing and buffing can also harm the skin around your nails, leaving it irritated or even damaged.
Here’s what happens when you overdo it:
-
Your nails lose their natural strength and flexibility.
-
The surrounding skin becomes more vulnerable to cuts and infections.
-
Thin nails are more likely to split, peel, or develop painful ridges.
If you’ve ever wondered why your nails feel brittle after home manicures, over-filing could be the culprit. It’s a dangerous DIY nail mistake that’s easy to avoid once you know the right techniques.
How to File Nails Safely
The good news? Filing your nails safely is simple when you use the right tools and methods. Start by trimming long nails with fingernail clippers before reaching for a file. Glass nail files are a great choice—they’re gentle on your nails and easy to clean.
When filing, always work from the outer corners toward the center. Avoid the back-and-forth sawing motion, as it can weaken your nails. Here’s a quick checklist for safe filing:
-
Use a light touch to prevent over-thinning.
-
Apply nail oil or cuticle oil after filing to repair frayed edges.
-
Keep your tools clean and dry to avoid introducing bacteria.
By following these steps, you’ll protect your nails and keep them looking their best. Whether you’re doing a DIY pedicure or a full manicure, proper filing techniques make all the difference.
Mistake #2: Using Expired Nail Products
Risks of Expired Products
Using expired nail products might seem harmless, but it’s one of the most common nail mistakes that can lead to serious issues. Old nail polish or gel can harbor bacteria and mold, which increases your risk of infections. Imagine applying a product that’s been sitting in your drawer for years—gross, right?
Expired products also lose their effectiveness. That means your polish might not dry properly, or it could chip within hours. Worse, some ingredients in old products can break down and irritate your skin or nails. If you’ve ever experienced redness or itching after a DIY pedicure, expired products could be the culprit.
Tip: Always check the expiration date before using any nail product. It’s better to toss it than risk your nail health.
How to Check and Replace Old Products
You don’t need to be a chemist to figure out if your nail products are past their prime. Start by looking for changes in texture, color, or smell. If your polish has separated or smells off, it’s time to say goodbye.
Here’s a quick guide to product shelf life:
-
Regular nail polish: 1 year after opening.
-
Gel polish: 6 months after opening.
-
Nail treatments: Check the label for specific dates.
To avoid using expired products, label your bottles with the date you opened them. This simple habit can save you from dangerous DIY nail mistakes. When replacing old products, opt for high-quality brands that prioritize safety.
By keeping your nail kit fresh, you’ll enjoy better results and healthier nails.
Mistake #3: Ignoring UV Lamp Dangers
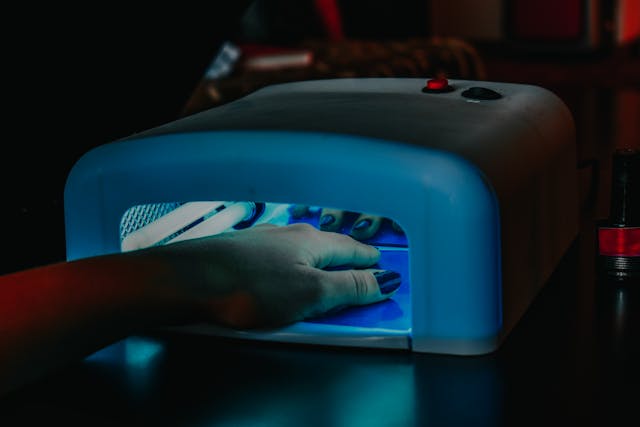
The Risks of UV Exposure
You might love the glossy finish of a gel manicure, but have you ever thought about the risks of using UV lamps to cure your nails? These lamps emit UVA radiation, which penetrates deep into your skin. Over time, this exposure can lead to serious health concerns.
Here’s what dermatologists have found:
-
A woman who used UV lamps for 15 years developed squamous cell carcinoma, requiring surgery.
-
Another individual faced multiple skin cancers after 18 years of regular UV lamp use.
-
Experts are seeing a rise in skin cancer cases linked to frequent UV lamp exposure.
Even if the risk seems small, why take the chance? Protecting your skin should always be a priority during your DIY nail routine.
Tip: Always apply sunscreen with SPF 30 or higher to your hands before using a UV lamp.
Safer Alternatives to UV Lamps
Thankfully, you don’t have to give up your DIY pedicure or manicure to stay safe. There are plenty of alternatives that reduce your exposure to harmful UV rays:
-
Switch to LED lamps. They emit less UV radiation and cure nails faster.
-
Let your nails air dry. It’s the safest option, though it takes more time.
-
Wear UV-protective gloves. These gloves shield your skin while leaving your nails exposed.
If you’re sticking with UV or LED lamps, don’t forget to apply sunscreen or cover your hands with a cloth. Small changes like these can make a big difference in protecting your skin.
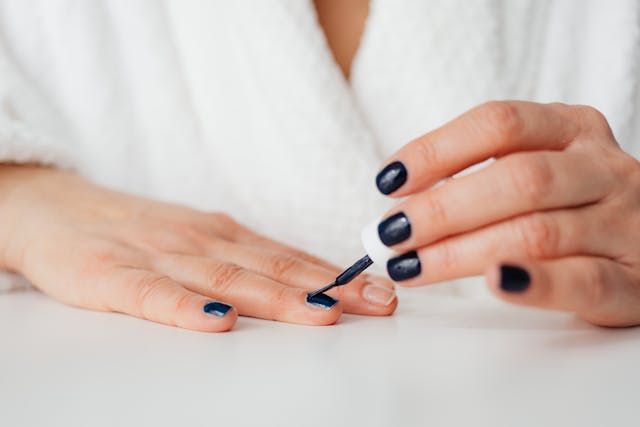
Mistake #4: Pressing Too Hard During Polish Application
How Excessive Pressure Damages Nails
Pressing too hard while applying nail polish might seem harmless, but it’s one of the most common nail mistakes that can weaken your nails over time. When you apply too much pressure, the nail bed gets compressed, which can lead to peeling, ridges, or even cracks. This damage isn’t just cosmetic—it can make your nails more prone to infections and breakage.
Have you noticed your nails looking uneven or feeling rough after a DIY pedicure? That’s often the result of excessive pressure during polish application. Thick layers of product applied with force can also trap air bubbles, making your manicure look messy and less durable.
Tip: If your nails feel sore or look dented after polishing, it’s a sign you’re pressing too hard.
Proper Polish Application Techniques
The good news? You can avoid this mistake with a few simple adjustments. Start by using a high-quality brush that glides smoothly over your nails. Instead of pressing down, let the brush do the work. Hold it at a slight angle and use light, even strokes.
Here’s a quick step-by-step guide:
-
Dip the brush lightly into the polish—don’t overload it.
-
Start at the base of your nail and gently sweep toward the tip.
-
Apply thin coats instead of thick layers of product.
By using these techniques, you’ll achieve a flawless finish without damaging your nails. Remember, nail care is about patience and precision. A little extra care goes a long way in avoiding dangerous DIY nail mistakes.
Mistake #5: Skipping Nail ‘Breaks’ Between Manicures
Why Nails Need Recovery Time
Your nails might look great with constant manicures, but skipping breaks can lead to serious problems. Nails need time to recover and breathe. When you keep them covered with polish or thick layers of product, they can become brittle and weak. Over time, this can cause peeling, splitting, or even painful cracks.
Think of it this way: your nails are like your skin. They need care and rest to stay healthy. Without breaks, the keratin in your nails depletes, leaving them fragile. Studies show that taking just a two-week break can make your nails up to 60% stronger. If you’ve noticed your nails looking dull or feeling thin, it’s a sign they need some downtime.
Tip: Give your nails a breather every few weeks to keep them strong and healthy.
How to Create a Healthy Nail Care Routine
Building a nail care routine doesn’t have to be complicated. By following a few simple steps, you can keep your nails in great shape while still enjoying your DIY manicures. Here’s how:
-
Clip your nails regularly to prevent snags.
-
Prioritize nail health over length for stronger nails.
-
Always keep a nail file handy for quick fixes.
-
Take care of your nail tools to prevent infections.
-
Leave your cuticles alone to maintain protection.
-
Load up on protein-rich foods to support nail strength.
By incorporating these habits, you’ll create a routine that balances beauty and health. Remember, healthy nails are the foundation of any great manicure. Taking breaks and following these steps will help you avoid long-term damage while still enjoying your favorite nail looks.
Mistake #6: Cutting Nails When They’re Dry
Why Dry Nails Splinter
Have you ever noticed your nails splitting or cracking after trimming them? That’s because cutting dry nails can cause them to splinter. When your nails are dry, they lose flexibility and become brittle. This makes them more likely to break unevenly or develop jagged edges.
Think of your nails like a dry twig. A twig snaps easily when it’s dry, but it bends when it’s moist. Your nails behave the same way. Dry trimming not only damages the nail itself but also creates sharp edges that can snag on fabrics or even scratch your skin. These rough edges can trap dirt and bacteria, increasing the risk of infections.
Tip: If your nails feel hard or brittle, it’s a sign they need moisture before trimming.
The Best Time and Tools for Trimming

Timing is everything when it comes to cutting your nails. The best time to trim them is right after a shower or a warm soak. At this point, your nails are softer and more pliable, making them easier to cut without splintering.
Use the right tools to get the job done safely. A pair of curved nail scissors or high-quality clippers works best. Avoid using dull tools, as they can crush the nail instead of cutting it cleanly. After trimming, smooth the edges with a gentle nail file to prevent snags.
By trimming your nails at the right time and using proper tools, you’ll avoid unnecessary damage. Whether you’re doing a diy manicure or just basic nail care, these small changes can make a big difference.
Mistake #7: Storing Tools in Humid Bathrooms
How Humidity Promotes Bacteria and Mold
Storing your nail tools in the bathroom might seem convenient, but it’s one of the worst places to keep them. Bathrooms are naturally humid, especially after showers or baths. This damp environment creates the perfect breeding ground for bacteria, mold, and even rust on metal tools.
When your tools sit in a humid space, they can collect moisture, which encourages harmful microorganisms to grow. Over time, this can lead to infections if you use those tools on your nails. For example, nail clippers or cuticle pushers stored in a damp bathroom can harbor bacteria like E. coli or fungi that cause nail infections.
Tip: If your tools feel damp or have a musty smell, it’s time to rethink where you’re storing them.
Proper Storage Tips for Nail Tools
Keeping your tools clean and dry is essential for safe nail care. Start by sanitizing them after every use. Wash them in hot, soapy water to remove dirt and debris. For extra hygiene, boil your tools for a few minutes, then dry them thoroughly.
Once clean, store your tools in a dry, cool place. Avoid leaving them in the bathroom. Instead, use an airtight container with silica gel packs to absorb any moisture. Make sure to open tools like scissors fully when cleaning to remove dust from hinges. Disinfect every part of the tool, even if it takes multiple rounds.
By following these steps, you’ll keep your tools in top condition and reduce the risk of infections. A little extra care goes a long way in your diy nail routine.
Mistake #8: Peeling Off Gel Polish
The Damage Caused by Peeling
Peeling off gel polish might feel satisfying, but it’s one of the worst things you can do to your nails. When you peel, you’re not just removing the polish—you’re also stripping away layers of your natural nail. This weakens the nail plate, leaving it thin, brittle, and prone to splitting.
Have you ever noticed white spots or rough patches on your nails after peeling off gel polish? That’s the damage in action. These spots indicate keratin loss, which takes weeks to repair. Plus, peeling can create tiny cracks in your nails, making them more vulnerable to infections.
Tip: If you’re tempted to pick at your polish, remind yourself that the short-term satisfaction isn’t worth the long-term damage.
Safe Gel Polish Removal Methods
Removing gel polish safely doesn’t have to be complicated. Follow these steps to protect your nails:
-
Apply a thin layer of petroleum jelly around your cuticles to shield your skin from acetone.
-
Cut small pieces of cotton to fit your nails.
-
Soak the cotton in acetone and place it on each nail.
-
Wrap your nails tightly with plastic food wrap to keep the acetone in place.
-
Wait 10 minutes, then gently rub off the polish with a warm, wet washcloth.
-
Wash your hands with mild soap and water to remove any residue.
-
Moisturize your cuticles daily for a week to restore hydration.
Dr. Lipner advises against using tools like orange sticks to scrape off polish, as they can cause white spots and further weaken your nails. Instead, stick to acetone-based removal with protective measures.
By taking these steps, you’ll avoid the damage caused by peeling and keep your nails healthy. Whether you’re a diy enthusiast or a salon regular, safe removal methods are essential for strong, beautiful nails.
Mistake #9: Skipping Base and Top Coats
Why Base and Top Coats Matter
Skipping base and top coats might seem like a time-saver, but it’s a mistake that can cost you the health and longevity of your nails. Base coats do more than just prep your nails for polish. They hydrate and strengthen your nails, preventing damage over time. Many base coats are packed with vitamins and natural oils, which nourish your nails and help them grow stronger.
Base coats also smooth out ridges and uneven surfaces, giving your polish a flawless finish. Without them, your nail polish might not adhere properly, leading to streaks or uneven color. Plus, they enhance the vibrancy of your polish, making your manicure look professional.
Top coats, on the other hand, act as a protective shield. They prevent chips and scratches, keeping your manicure fresh for days. Some top coats even strengthen your nails while promoting growth. Skipping this step leaves your nails vulnerable to damage and your polish prone to early wear.
Tip: Think of base and top coats as the foundation and sealant of your manicure. They’re essential for both nail health and polish longevity.
How to Use Them for Stronger, Longer-Lasting Nails
Using base and top coats isn’t complicated, but doing it right makes all the difference. Start with clean, dry nails. Apply a thin layer of base coat, making sure to cover the entire nail surface. Let it dry completely before adding your polish. This step ensures the base coat bonds properly with your nails.
After applying your polish, finish with a top coat. Use light, even strokes to avoid smudging the color. Seal the edges of your nails by brushing the top coat along the tips. This technique helps prevent chipping and extends the life of your manicure.
If you’re into diy nail care, investing in high-quality base and top coats is a game-changer. They not only protect your nails but also make your manicure look salon-worthy. With these simple steps, you’ll enjoy stronger, healthier nails and a longer-lasting polish finish.
Mistake #10: Using Harsh Chemicals on Nails
The Impact of Acetone and Other Chemicals

Using harsh chemicals like acetone might seem like a quick fix for removing nail polish, but it can wreak havoc on your nails. Acetone strips away natural oils, leaving your nails dry, brittle, and prone to splitting. It doesn’t stop there—it also dehydrates the surrounding skin, causing your cuticles to crack and peel. If you’ve ever noticed your nails looking dull or feeling rough after a DIY manicure, acetone could be the culprit.
Other harsh chemicals in nail products, such as formaldehyde or toluene, can weaken your nails over time. These ingredients may even cause allergic reactions, especially if you’re painting over your cuticles or using them frequently. The improper removal of hangnails with chemical-based products can also lead to irritation or infections.
Tip: Always check the ingredient list before using any nail product. Avoid anything with strong solvents or irritants to protect your nails and skin.
Gentle Alternatives for Nail Care
You don’t have to rely on harsh chemicals to keep your nails looking great. There are plenty of gentle alternatives that clean up mistakes without causing damage. Acetone-free nail polish removers are a fantastic option. They often include nourishing ingredients like aloe vera, vitamin E, and essential oils, which help maintain the health of your nails and cuticles.
These alternatives are also safer for sensitive skin, making them a more comfortable choice. Plus, they’re better for the environment since they don’t release as many harmful fumes into the air. Whether you’re dealing with natural nails, acrylics, or gel manicures, these removers work effectively across all nail types.
Switching to gentler products isn’t just about avoiding damage—it’s about creating a nail care routine that prioritizes health. By making small changes, you’ll protect your nails and enjoy stronger, healthier results.

